

Acer Aspire 5552 Red Screen Repair?
Acer Recovery Disk: Guide for Windows XP, Vista, vii, eight
This is a guide nigh recovery disks for Acer computers for the following versions of Windows: Windows XP, Windows Vista, Windows 7 and Windows viii.
A recovery disk is also known every bit a restore disc, repair disc, boot disc or rescue disk.
![]()
Acer users can create a recovery and backup disk using the computer's installed Acer eRecovery Management software. This software is available in well-nigh computers made by Acer, past default – unless removed manually.
Looking for a recovery deejay for Acer? Download Easy Recovery Essentials, our recovery and repair deejay for Acer computers.
Note: Depending on your computer model the following screenshots and steps from these instructions might be slightly unlike.
Contents
- i Download alternative recovery disk for Acer
- ii Create the recovery disks for Acer using Acer eRecovery Management
- ii.ane Create the recovery disk in Windows XP
- 2.two Create the recovery disk in Windows Vista
- 2.three Create the recovery disk in Windows 7
- 2.4 Create the recovery disk in Windows eight
- 3 Restore Acer computers
- 3.1 Restore instructions for Windows XP
- three.two Restore instructions for Windows Vista
- 3.three Restore instructions for Windows 7
- 3.4 Restore instructions for Windows eight
- 4 Troubleshooting
- 4.one Acer eRecovery Management is not working
- iv.2 Acer eRecovery Management is stuck
- iv.3 Forgot the password for Acer eRecovery Management
- 4.3.1 Default password
- 4.3.2 Alter the password
- four.3.3 Run Acer eRecovery Management in Condom Mode
- 4.3.4 Find the aimdrs.dat file on the recovery partition
- 4.four Creating the USB recovery drive in Windows viii doesn't work
- 5 More Information
- 5.1 Support Links
- 5.two Applicable Systems
- 5.three Applicable Models
Download culling recovery deejay for Acer
If the recovery partition of your Acer computer is decadent or not working, you can download Easy Recovery Essentials that is compatible with Acer computers and with Windows XP, Vista, 7 or viii:
- Microsoft Windows 8 (read more than on our Windows 8 Recovery Disk and Repair Disc Download commodity)
- Microsoft Windows 7 (read more on our Windows 7 Recovery Deejay and Repair Disc Download article)
- Microsoft Windows Vista (read more than on our Windows Vista Recovery Disk and Repair Disc Download article)
- Microsoft Windows XP (read more than on our Windows XP Recovery and Repair Deejay commodity)
- Microsoft Windows Server 2003, 2008 and 2022 (read more on our Windows Server 2008 and 2022 Recovery Discs Download commodity)

You tin can burn down Easy Recovery Essentials directly to a CD, DVD or a USB flash drive.
Y'all can apply its Automatic Repair characteristic to automatically find and fix boot errors of your calculator.
Download Easy Recovery Essentials for Acer
Note: Easy Recovery Essentials can non be used to install or reinstall Windows.
Create the recovery disks for Acer using Acer eRecovery Management
Acer computers have, by default, a recovery partition (like to the recovery sectionalization of Dell computers) that allows users to restore their Windows organisation.
The software that allows you to create a recovery media, reinstall Windows without the original installation deejay and reinstall the drivers of your system is called Acer eRecovery Direction.
The Acer eRecovery Direction software
The eRecovery Management software can look dissimilar, depending on your Acer model. Here is how it looks on computers with Windows XP:
The Acer eRecovery Management software on dissimilar Acer models
The software for Windows 8 users should look like this:
The Acer eRecovery Management software for Windows 8 users
Acer eRecovery Direction allows you to:
- Restore your Windows using Recovery Management
- Create and apply a recovery media (CD, DVD or USB)
- Reinstall your system drivers and applications
Create the recovery disk in Windows XP
Windows XP users can create a recovery disk for their Acer computers (desktops, laptops/notebooks etc.) by following these instructions.
USB wink drives are not available equally a recovery media for Windows XP users.
- Boot your estimator. The Air conditioning adapter must be plugged in, if you accept an Acer laptop.
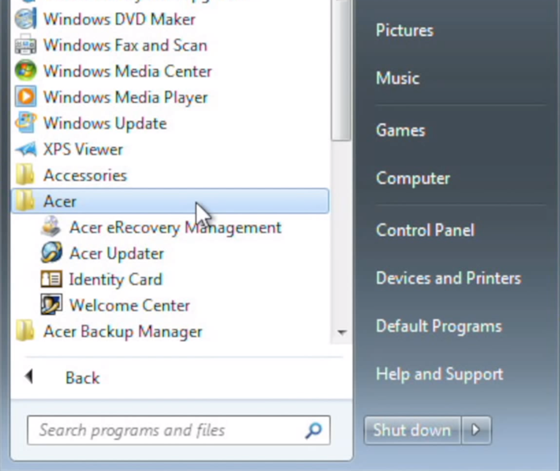
- Go to First and so All Programs.
- Discover the Acer Empowering Technology binder.
If the folder proper noun is simply "Acer" and non "Acer Empowering Technology", follow the instructions for Windows Vista (observe these below). Your Windows XP organization uses a different software version with different steps.
- Click on Acer eRecovery Management.
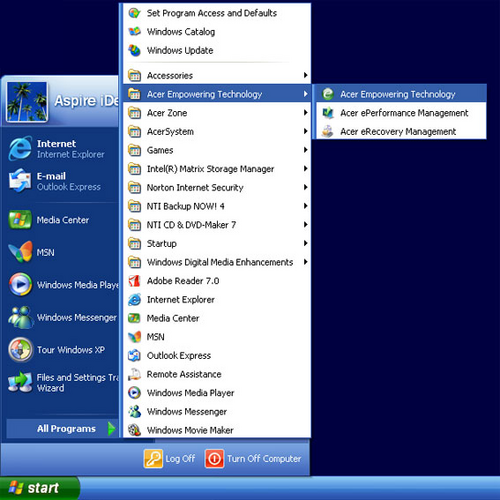
The Acer Empowering Engineering binder
- Click on the icon that appears in the bottom right of your desktop.

The Acer eRecovery Management icon in Windows XP
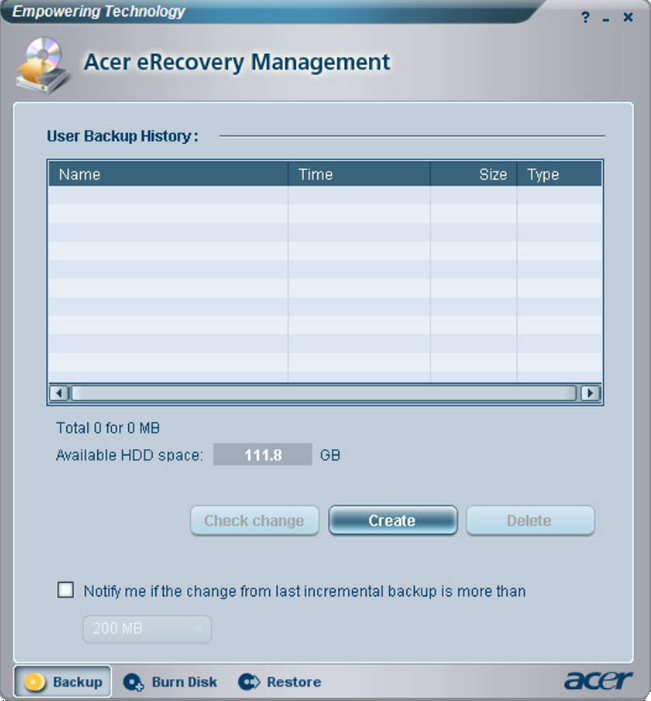
- Acer eRecovery Management at present loads.
The Acer eRecovery Management software in Windows XP
- If this is your showtime time loading the software program, it will ask you lot to:
- To enter a password for the software. Do so by following the sorcerer instructions. Continue the password easy to remember and safe.
- To create your first factory default settings image CD/DVD. If then, but add the necessary blank CDs or DVDs (the software will mention how many disks you need) and click OK.At this step, this screen should appear like this:
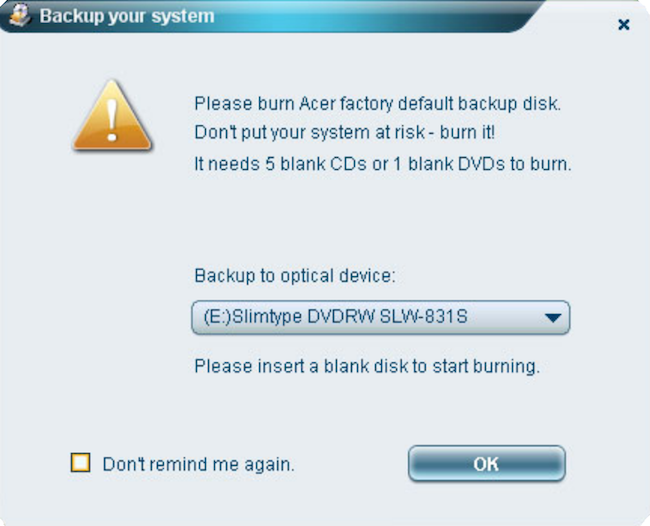
Acer eRecovery Management Factory Default Settings Image
- To create the recovery deejay, click the Create button.
- Select the Full backup selection and click Next. The Incremental backup (fast) option will be active later the first Full backup is done. Incremental backups are faster and they use less space.
- Enter a reference name for this fill-in and click Adjacent.
- If the software plan prompts to shut all running programs, do and then past clicking Yes and so Next.
- At the Exercise y'all want to continue? screen, brand sure Aye is selected and click Next.
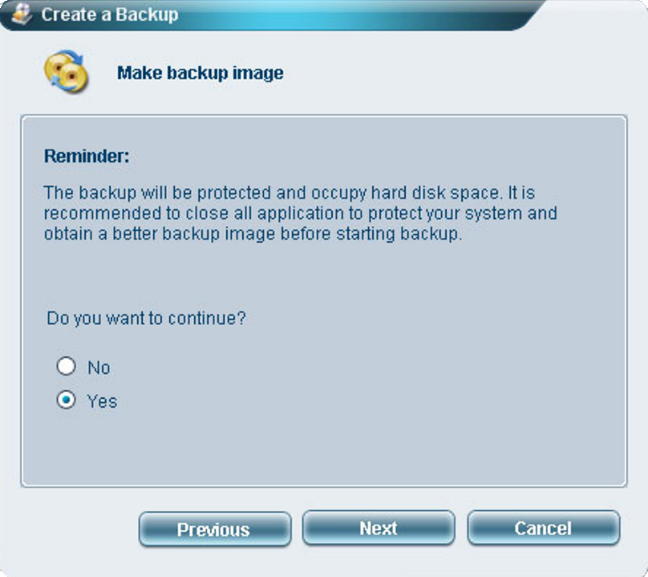
Exercise you lot want to keep creating the fill-in discs?
- The creation process starts.
- When the procedure is finished, a confirmation message will appear – Fill-in files take been successfully created -, click OK.
- Become to the Fire Disk tab of the software plan. This should be at the bottom of the software's screen.
- Click on Burn a fill-in disk using user's backup. This option will burn your backups to a CD or DVD.
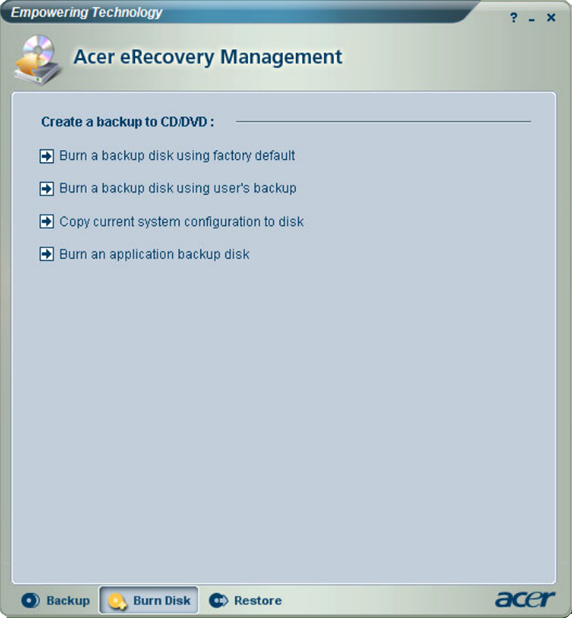
Burn a backup deejay item
- Select your optical drive to employ and click OK.
- Insert whatsoever additional CD or DVD needed when prompted.
- When the process is done, label these disks and proceed them safe1
Create the recovery deejay in Windows Vista
Users with Windows Vista installed can create a recovery deejay for their Acer reckoner using these instructions:
- Power on your reckoner. The Air conditioning adapter must be plugged in for laptops.
- Go to Kickoff and find the "Acer" folder. You tin type Acer in the Search programs and files search bar.
If the folder name is "Acer Empowering Technology", follow the instructions from Windows XP equally your Windows Vista uses a different software version with slightly unlike steps.
- In this binder, click on Acer eRecovery Management.
The Acer binder at Commencement
- If Windows' User Account Control opens and asks for permission to run the program, click Yes.
- Click Backup from the left menu.
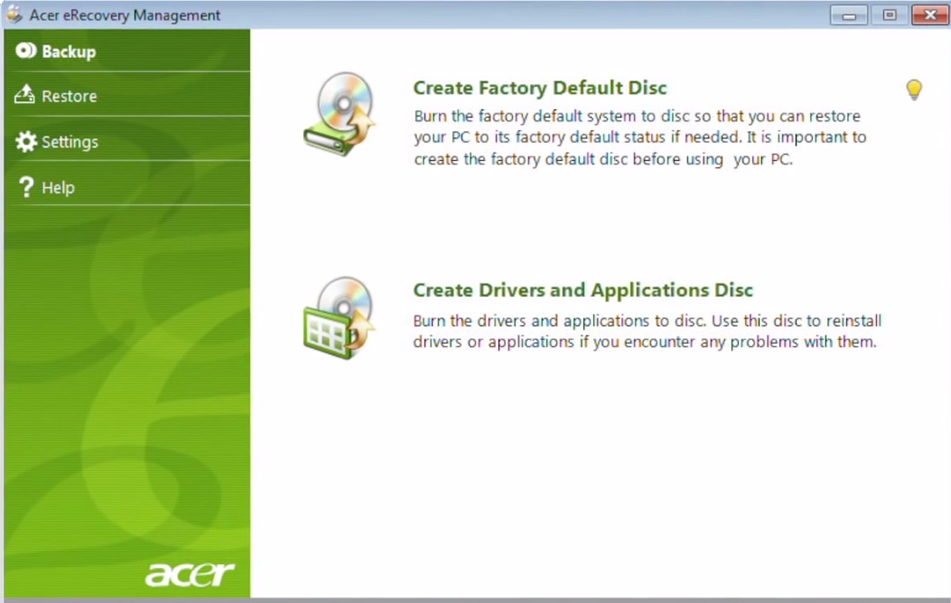
- Click on Create Factory Default Disc.
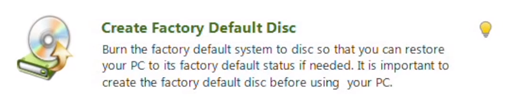
Create Factory Default Disc
- Insert your first blank DVD.
All DVDs you program to use for this process must exist bare.
The software volition notify you how many DVDs you need to create the set of recovery disks. When the first DVD is finished, the software will ask for the second DVD:

Disc i is finished
Remove the commencement DVD, characterization it and so insert some other blank DVD. And then on until the procedure is complete.
- When the software finishes the process, click Finish to get out the programme.
- Your recovery disks are now created. Label them and keep them safe!
Create the recovery disk in Windows 7
Windows 7 users with Acer computers tin can follow these instructions to create the recovery disks. These instructions are similar with those of Windows Vista.
- Kicking your computer. The AC adapter must exist plugged in for any Acer laptops earlier starting this procedure.
- Go to Start and find the "Acer" binder in All Programs. You can blazon the binder proper name in the Search programs and files search bar.
If the folder name is "Acer Empowering Technology" and not "Acer", follow the steps from Windows XP.
- Click on Acer eRecovery Management.
Find the Acer binder by clicking on Start
- Click Yes, if Windows UAC dialog opens and asks permission to run the software.
- Click Backup
- Click Create Factory Default Disc.
Click on Create Factory Default Disc
- Insert the first DVD.
All DVDs for this process must exist blank.
- Insert the second DVD when prompted:
Disc one is finished. Insert disc 2
- Click Finish when the cosmos procedure is washed
- Your recovery disks are at present created. Label them with a permanent marker and keep them safe!
Create the recovery disk in Windows 8
Windows eight users tin create their set of recovery disks for Acer using the following instructions.
A CD or a DVD is not available as a recovery media for Windows 8. Use only USB flash drive with more than 16 GB in available file size. Brand sure the bulldoze you are nearly to utilise is blank. All previous data will be removed from the wink bulldoze during this process.
- Boot the estimator.
- When Windows viii boots, simply beginning typing "recovery" to open the Windows 8 Search Charm (or press the
 and Q). A search consequence will appear for "Acer Recovery Management". Click on that proper noun.
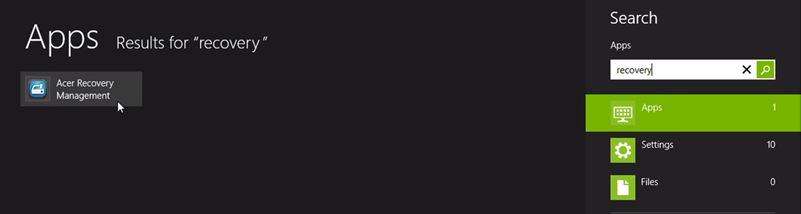
Acer Recovery Management software in Windows viii
- If y'all receive this bulletin – Do you want to allow the following plan to brand changes to this estimator? – from the Windows 8 UAC (User Account Control), click Yes.
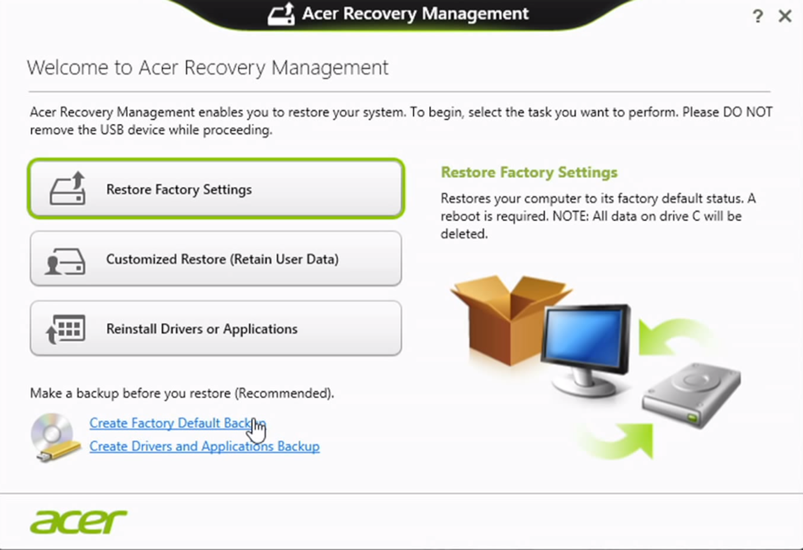
- The Acer Recovery Management software volition now load.
How Acer eRecovery Management software should look
- Click on Create Factory Default Backup.
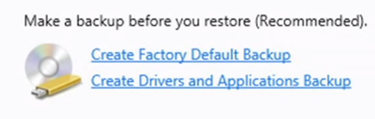
Create Factory Default Fill-in in Windows 8
- The "Create a recovery drive" screen will appear, click Next. You can exit the Copy the recovery partition from the PC to the recovery bulldoze checkbox checked.
- When the "Select the USB wink drive" screen appears, make sure your USB flash drive is listed at the "Available bulldoze(s)" listing, it has at least 16 GB in available size and information technology's bare.
Alarm:
All data from the USB flash drive will be removed. Backup your USB drive before using it equally a recovery media. - Click Side by side
- Click Create at the warning bulletin Everything on the bulldoze will exist deleted. If you take any personal files on this drive, make sure you've backed up the files.
- The process of creating the recovery disk will at present begin. It can take upwardly to 30 minutes, if the "Re-create the recovery partition" checkbox was checked, otherwise information technology will take less time.
- When the process is done, at the "The recovery drive is fix" screen, click Finish.
- Exit the software.
- Label your USB drive and keep it rubber, away from impairment of whatever kind or loss!
Restore Acer computers
You tin restore your organisation using the recovery sectionalisation that comes bundled in with your Acer figurer.
Y'all can kick into the recovery manner by pressing and holding the Alt and F10 cardinal, when the splash screen appears (at the Acer logo), after you lot restart your computer.
If you haven't created a backup deejay of your computer using Acer eRecovery Direction, you can only restore your calculator to its factory default settings.
Alert:
Restoring your computer to its manufactory default settings erases all data from your computer and reinstalls Windows. Backup your files before you continue with this process.
You can use the Browse/Fill-in files feature of Easy Recovery Essentials (our recovery and repair disk) to access and fill-in your files. Download Easy Recovery Essentials for Acer computers from here.
Restore instructions for Windows XP
Restore your Acer estimator to its factory default settings or to the latest saved backup deejay settings past following the instructions below.
If you lot are not able to kicking into Windows XP to open Acer eRecovery Management, you need to:
- Restart your computer.
- Press and hold the Alt + F10 keys to boot into the Acer eRecovery Management software, when the Acer splash screen appears.
If you want to restore the computer to its default mill settings without using the recovery disks, these are the instructions:
- If your reckoner has the Acer eRecovery Management software branded with Empowering Technology, proceed with these instructions:
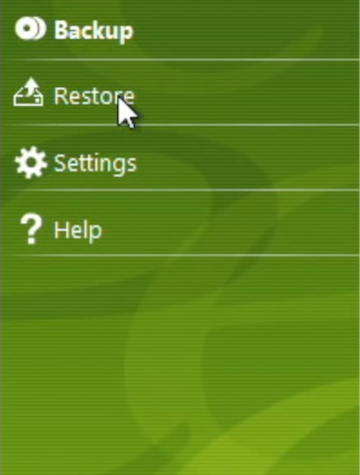
- Make sure the Restore tab is selected.
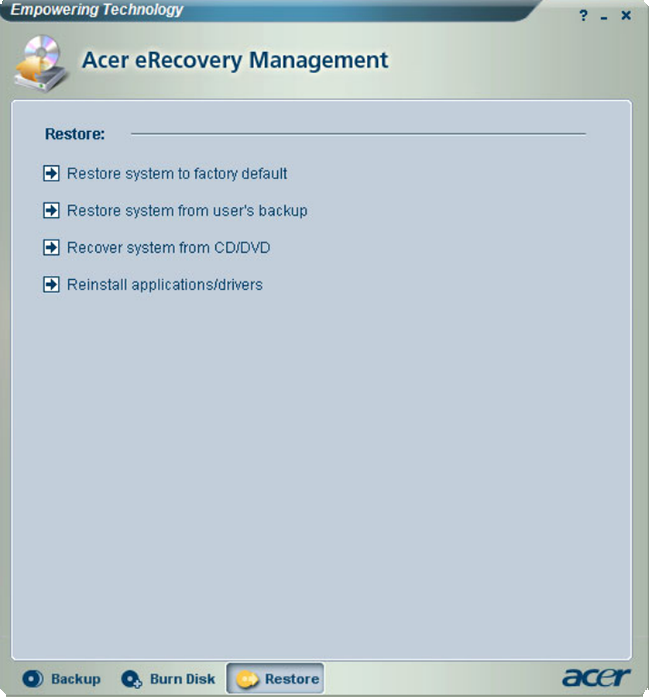
Restore Tab in Acer eRecovery Management Empowering Technology
- Click on Restore system to factory default.
- Enter the Acer eRecovery Management software password. Past default this is
000000(6 zeros). If you can non recall it, go to Troubleshooting for more data and find out how y'all tin recover the password. - Confirm that you lot want to proceed with the restore process.
Alert:
This process erases all your data. Fill-in your files! - Follow the next set of instructions from the magician.
- Make sure the Restore tab is selected.
- If the Acer eRecovery Management software your calculator uses doesn't mention Empowering Technology, continue with these instructions:
- Click Restore from the left.
Restore tab in Acer eRecovery Management
- Click on Completely Restore Arrangement to Factory Defaults.
- Select Yes when the "This process will reboot and restore your system" window appears.
- Click Start.
- Click OK to confirm.
- Your computer will now restart and boot into the Acer eRecovery Management program.
- At the "Discover" screen, click Next.
- Click Next at the "Restore Destination" screen.
- Click OK to confirm the action.
- The restore process should now offset. It may take up to 30-40 minutes.
- When the Restore finished message appears, click OK.
- Your computer volition restart and Windows will reconfigure. Your computer may restart afterwards.
- Click Restore from the left.
If you want to restore the computer using your saved Acer recovery disks, follow these instructions. These utilise for the Acer eRecovery Management software branded with the Empowering Technology name:
- Select the Restore tab.
The Restore Tab
- Click on Recover system from CD/DVD.
- Insert the first disk of your recovery disks set into your optical bulldoze.
- Confirm the process.
Alert:
This procedure will erase all your data. Fill-in your files first! - Insert any of the side by side ready of disks when prompted by the software.
Restore instructions for Windows Vista
If you desire to restore the estimator using the created Acer recovery disks, follow these steps. These instructions are for Windows Vista.
These steps are for the Acer eRecovery Direction software without the Empowering Engineering science name. If your software version for the Windows Vista system is branded with Empowering Technology, follow the steps from Windows XP.
The Windows Vista software version should look similar this:
The Acer eRecovery Management software
The instructions are:
- Kick your computer and press F12 repeatedly to enter the Boot carte du jour.
- When the Kicking menu has loaded, use your arrow keys and select your optical drive, e.one thousand. IDE CD-ROM Device
- Add your first disk from the recovery disk set and hitting Enter.
- The recovery media should now load.
- Follow the instructions from the sorcerer to reinstall your Windows Vista.
Restore instructions for Windows 7
You can restore your Windows seven using your saved sets of Acer recovery disks by following these instructions:
- Kick the reckoner.
- Press F12 repeatedly to enter the Kick card.
- Select your optical drive, eastward.g. IDE CD-ROM Device, by using your pointer keys: ↑ and ↓.
- Add the first disk from your recovery disks set.
- Hit Enter.
- Your Acer recovery media should load.
- Follow the magician instructions to reinstall your Windows seven.
Restore instructions for Windows 8
If yous are able to boot into Windows viii, you tin can restore your system by following these instructions:
- Press the and C to open the Search charm of Windows 8.
- Type "recovery" in the search bar.
- Select the Acer Recovery Management particular.
- If you are existence asked to let this software plan to make changes, click Yes.
- Click on Restore Factory Settings.

Restore Mill Settings in Windows 8
- Click Adjacent.
Warning:
Restoring to Mill Settings volition erase all your personal files. Backup your files first! - Select either Just remove my files or Fully clean the drive (this is recommended).
- Click Reset to ostend.
- The restore process volition now brainstorm.
- Follow any wizard instructions subsequently this process is done to setup your Windows eight once more.
If you lot are not able to boot into Windows eight, only have the USB recovery disk created, you can restore the system past post-obit these instructions:
- Power off your computer.
- Insert the USB recovery disk.
- Power on the computer.
- Press F2 as soon equally possible to enter BIOS. If you lot accept a desktop from Acer, press Del instead.
- Navigate to the Boot tab of BIOS using your pointer keys: ← and →.
- Discover a "USB HDD" (this is your USB recovery disk) detail from the list and highlight it by using your arrow keys: ↑ and ↓.
- When "USB HDD" is selected, printing F6 to move it at the superlative of the list. Depending on its current position, you may need to press F6 multiple times to move information technology up.
- Once "USB HDD" is at the top of the listing, navigate to the Exit tab using your pointer keys: ← and →.
- Highlight Exit Saving Changes using your arrow keys: ↑ and ↓ and striking Enter
- Brand certain [Yes] is selected and hit Enter.
- Your computer volition reboot.
- When Windows eight starts again, select a keyboard language.
- Click on Troubleshoot.
- Click on Reset your PC.
- Click Next to confirm the action.
Warning:
This action will erase all your personal files. Fill-in your files before proceeding! - Choose Windows 8 from the list.
- Select Yes, repartition the drives if you no longer accept the recovery partition Acer to reinstall this. Otherwise, select No, keep the existing partitions.
- Select Just remove my files or Fully make clean the drive. Fully make clean the drive longer, but cleans the unabridged drive (this is recommended).
- Click Reset.
- The process volition now start.
- Once the process is finished, the "Cull an option" screen will appear.
- Remove the USB recovery deejay.
- Click Go along at the "Choose an option" screen.
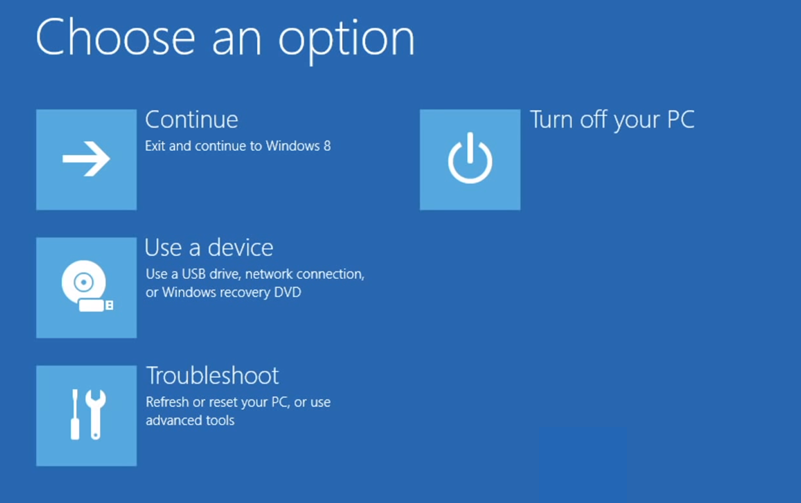
Choose an option at boot
- Follow the sorcerer instructions to setup your Windows eight again.
Troubleshooting
Acer eRecovery Management is non working
Acer eRecovery Direction may not work if the D2D recovery option in the computer's BIOS is disabled.
You lot tin enable D2D Recovery option by following these instructions:
- Boot your reckoner.
- Press F2 when the plash screen appears to open up BIOS.
- Navigate to Master tab by using the pointer keys (← and →).
- See if the D2D Recovery item (normally the terminal particular in the card) is marked every bit [Enabled] or [Disabled].If D2D Recovery is [Disabled], utilize the arrow keys (↑ and ↓) to select the D2D Recovery item and once it's selected (highlighted), printing Enter and then select Enabled.
Acer eRecovery Management is stuck
The Acer eRecovery Management can be stuck at various steps during either the process of creating the set of recovery disks or through the process of restoring the computer settings.
Common issues is having the software stuck at 0% or 99% or at loading files.
The hard deejay or the Acer recovery partition (required to restore the estimator to default settings) might be corrupted.
Yous tin can try 1 of the post-obit fixes (or both) beneath.
Warning:
If the recovery partition from Acer is corrupted and yous don't have a create recovery deejay fix, y'all may not be able to restore your computer.
You can use Easy Recovery Essentials (our recovery and repair disk) to automatically observe and fix boot errors. Download Easy Recovery Essentials.
Fix #1: Remove whatever peripherals from your computer and leave just the essentials (keyboard and mouse): printers, USB flash drives, scanners etc.
Fix #2: You lot can run the chkdsk command through Command Prompt to verify the integrity of your hard drive.
Alert:
chkdsk will check for hard drive bad sectors. If any bad sectors are plant, chkdsk volition try to repair the sectors resulting in potential data lost plant in any of those sectors. Fill-in your computer!
You demand to have your Windows installation CD to kick into Recovery Panel and admission Command Prompt.
If y'all don't have the original Windows CD, you can download Like shooting fish in a barrel Recovery Essentials, our recovery and repair disk for Windows. If your computer displays boot errors, yous can run the Automated Repair feature to automatically detect and ready boot errors.
Run the chkdsk command by following these steps:
- Insert your Windows installation CD.
- Restart your computer to kicking from the installation CD.
- Press any key when the "Press whatsoever cardinal to boot from CD" message appears on your computer.
- Depending on your Windows version, follow these steps:
- If you lot have Windows XP:
- Press R to open up the Recovery Panel at the Options menu.
- Type in your Administrator password.
- Hit Enter.
- If you have Windows Vista or Windows 7:
- Select "Repair your calculator" afterwards you select your language, time and keyboard method.
- Select your Windows installation drive (ordinarily C:\) and click Next.
- Click on Command Prompt from the Arrangement Recovery Options box.
- If you lot have Windows XP:
- When Command Prompt opens, blazon the post-obit command:
chkdsk /f /r
Windows Vista and seven users may need to add together the hard drive letter after
chkdsk, like this:chkdsk C: /f /r
where C: (without a trailing slash: /) is where y'all have Windows installed (usually C:).
- Afterward the
chkdskprocess is completed, restart your calculator. - Try running Acer eRecovery Management over again.
Forgot the password for Acer eRecovery Management
Default password
Acer eRecovery Management software default countersign is 000000 (6 zeros).
Change the password
If you need to change the password, simply you are able to boot your computer follow these instructions.
Depending on your Acer figurer model the following options can be slightly different, but yous should be able to change the countersign.
- Kick your estimator and discover the Acer eRecovery Management software (first by clicking Beginning, go to All Programs and find the "Acer" folder or the "Acer Empowering Technology" folder).
- When the software opens, either select Password: Change eRecovery Password and click Next (if you have this options; this depends on your software version) or go to Settings where you should detect an option to change your countersign.
Run Acer eRecovery Management in Safety Mode
If yous are not able to kicking into Windows, you tin try running Acer eRecovery Management in Rubber Style and effort changing the password from this mode.
To boot into Safety Mode, follow these instructions:
- Windows XP users:
- Press F8 multiple times earlier Windows XP splash screen appears.
- Select "Prophylactic Mode with Networking" from the Options menu.
- Windows Vista users:
- Press F8 multiple times before the Windows Vista splash screen is shown.
- Select the Prophylactic Mode option from the Avant-garde Kick Options menu.
- Windows vii users:
- Press F8 repeatedly after you restarted your reckoner.
- Select Safe Style from the Options carte.
- Windows 8 users:
- Restart your computer and immediately hold the Shift central and click on the Restart key.
- When the Startup Settings screen appears, select the Safe Fashion option.
Find the aimdrs.dat file on the recovery segmentation
If you are non able to boot into Windows or run the software in Prophylactic Mode to change the password, you can try the following alternative: finding the aimdrs.dat file on the recovery partitioning.
Y'all need to use a alive Linux CD to run commands in Terminal. When Terminal is open, run these commands:
- Type
ls /dev/sda1, striking Enter.If your computer has SATA drives, run
ls /dev/sda1. Otherwise, runls /dev/hda1. - Type
cd /mnt, hit Enter. - Blazon
mkdir acer, striking Enter.If you receive a "permission denied" error, run
sudo mkdir acer. - Type
ls, striking Enter to verify that an "acer" appears listed (folder created). - Type
mount /dev/sda1 /mnt/acer, striking Enter.If you lot receive the a "permission denied" error, run
sudo mountain /dev/sda1 /mnt/acer.If you used
hda1at stride #1, supplantsda1withhda1. In this case, the control would bemountain /dev/hda1 /mnt/acer. - Blazon
cd /mnt/acer, hit Enter. - Blazon
ls, hitEnter. A list of files should be listed at present, ane of each should be named asaimdrs.dat. - Type
cat aimdrs.dat, hit Enter. - Your Acer eRecovery Direction password should be at the [MyData] tab, under this format:
[MyData] PD=your_password
Or it tin be under this format:
[MyData] Password=your_password
Creating the USB recovery drive in Windows eight doesn't work
If the Acer Recovery Direction software for Windows 8 displays errors when creating the USB recovery bulldoze, make sure you accept all the Microsoft Windows updates available and installed to your computer.
Microsoft released a hotfix for this issue in May, 2022.
Your Windows 8 arrangement must take the updates released in May, 2022 by Microsoft installed.
More Information
Support Links
- Easy Recovery Essentials for Windows – our repair and recovery disk.
It'southward an easy-to-use and automated diagnostics disk. It's available for Windows 8, Windows 7 and Windows Vista. Information technology's as well available for Windows XP and Windows Server.
Read more at Windows Recovery Disks.
- The NeoSmart Support Forums, member-to-member technical support and troubleshooting.
- Get a discounted price on replacement setup and installation discs: Windows XP, Windows Vista, Windows 7, Windows eight.
Applicable Systems
This Windows-related knowledgebase commodity applies to the following operating systems:
- Windows XP (all editions)
- Windows Vista (all editions)
- Windows 7 (all editions)
- Windows eight (all editions)
- Windows viii.1 (all editions)
- Windows Server 2003 (all editions)
- Windows Server 2008 (all editions)
- Windows Server 2022 (all editions)
Applicative Models
This Acer-related knowledge base of operations commodity applies to the following computer models:
- Aspire series: 1300, 1350, 1360, 1400, 1410, 1420P, 1430, 1430Z, 1500, 1520, 1551, 1640, 1640Z, 1650, 1660, 1670, 1680, 1690, 1700, 1710, 1800, 1810T, 1810TZ, 1820PT, 1830, 1830T, 1830TZ, 2000, 2022, 2022, 2420, 2430, 2920, 2920Z, 2930, 2930Z, 3000, 3050, 3100, 3500, 3600, 3610, 3620, 3630, 3640, 3650, 3660, 3680, 3690, 3750, 3750G, 3750Z, 3750ZG, 3810T, 3810TZ, 3820T, 3820TG, 3820TZ, 3830, 3830G, 3830T, 3830TG, 3935, 4220, 4230, 4250, 4251, 4252, 4253, 4310, 4315, 4320, 4330, 4332, 4333, 4336, 4339, 4349, 4350, 4350G, 4352, 4352G, 4410, 4520, 4520G, 4530, 4535, 4535G, 4540, 4540G, 4551, 4551G, 4552, 4552G, 4553, 4553G, 4560, 4560G, 4625G, 4710, 4710G, 4710Z, 4710ZG, 4715Z, 4720, 4720G, 4720Z, 4720ZG, 4730, 4730Z, 4730ZG, 4732Z, 4733Z, 4735Z, 4735ZG, 4736, 4736G, 4736Z, 4736ZG, 4738, 4738G, 4738Z, 4738ZG, 4739, 4739Z, 4740, 4740G, 4741, 4741G, 4741ZG, 4743, 4743Z, 4745, 4745G, 4745Z, 4749, 4749Z, 4750, 4750G, 4750Z, 4750ZG, 4752, 4752G, 4752Z, 4752ZG, 4755, 4755G, 4810T, 4810TG, 4810TZ, 4810TZG, 4820, 4820G, 4820T, 4820TG, 4820TZ, 4820TZG, 4830, 4830G, 4830T, 4830TG, 4830Z, 4920, 4920G, 4925, 4925G, 4930, 4930G, 4930ZG, 4935, 4935G, 4937, 4937G, 5000, 5010, 5020, 5030, 5040, 5050, 5100, 5110, 5220, 5230, 5235, 5250, 5251, 5252, 5253, 5310, 5315, 5320, 5330, 5332, 5333, 5334, 5335, 5336, 5338, 5342, 5349, 5350, 5410, 5500, 5500Z, 5510, 5515, 5516, 5517, 5520, 5520G, 5530, 5530G, 5532, 5534, 5535, 5536, 5536G, 5538, 5538G, 5540, 5541G, 5542, 5542G, 5550, 5551, 5551G, 5552, 5552G, 5553, 5553G, 5560, 5560G, 5570, 5570Z, 5580, 5590, 5600, 5610, 5610Z, 5620, 5625, 5625G, 5630, 5650, 5670, 5680, 5710, 5710G, 5710Z, 5710ZG, 5715Z, 5720, 5720G, 5720Z, 5720ZG, 5730, 5730G, 5730Z, 5730ZG, 5732Z, 5732ZG, 5733, 5733Z, 5734Z, 5735, 5735Z, 5736G, 5736Z, 5737Z, 5738, 5738DG, 5738DZG, 5738G, 5738PG, 5738PZG, 5738Z, 5738ZG, 5739, 5739G, 5740, 5740DG, 5740G, 5741, 5741G, 5741Z, 5741ZG, 5742, 5742G, 5742Z, 5742ZG, 5745, 5745DG, 5745G, 5745P, 5745PG, 5745Z, 5749, 5749Z, 5750, 5750G, 5750Z, 5750ZG, 5755, 5755G, 5810T, 5810TG, 5810TZ, 5810TZG, 5820, 5820G, 5820T, 5820TG, 5820TZ, 5820TZG, 5830G, 5830T, 5830TG, 5910, 5910G, 5920, 5920G, 5925G, 5930, 5930G, 5930Z, 5935G, 5940G, 5942G, 5943G, 5951G, 6530, 6530G, 6920, 6920G, 6930, 6930G, 6930Z, 6930ZG, 6935, 6935G, 7000, 7100, 7110, 7220, 7230, 7235G, 7250, 7250G, 7315, 7320, 7330, 7339, 7520, 7520G, 7530, 7530G, 7535, 7535G, 7540, 7540G, 7551, 7551G, 7552G, 7560, 7560G, 7715Z, 7720, 7720G, 7720Z, 7720ZG, 7730, 7730G, 7730Z, 7730ZG, 7735, 7735G, 7735Z, 7735ZG, 7736, 7736G, 7736Z, 7736ZG, 7738G, 7739, 7739G, 7739Z, 7739ZG, 7740, 7740G, 7741, 7741G, 7741Z, 7741ZG, 7745, 7745G, 7745Z, 7750, 7750G, 7750Z, 7750ZG, 8530, 8530G, 8730, 8730G, 8730ZG, 8735, 8735G, 8735ZG, 8920G, 8930G, 8935G, 8940G, 8942G, 8943G, 8950G, 8951G, 9100, 9110, 9120, 9300, 9400, 9410, 9410Z, 9420, 9500, 9510, 9520, 9800, 9810, 9920, 9920G, E1-410, E1-410G, E1-421, E1-422, E1-422G, E1-430, E1-430G, E1-430P, E1-431, E1-431G, E1-432, E1-432G, E1-432P, E1-451G, E1-470, E1-470G, E1-470P, E1-470PG, E1-471, E1-471G, E1-472, E1-472G, E1-472P, E1-510, E1-510P, E1-521, E1-522, E1-530, E1-530G, E1-531, E1-531G, E1-532, E1-532G, E1-532P, E1-532PG, E1-570, E1-570G, E1-571, E1-571G, E1-572, E1-572G, E1-572P, E1-572PG, E1-731, E1-731G, E1-732G, E1-771, E1-771G, E1-772, E1-772G, EC-471G, R7-571, R7-571G, R7-572, R7-572G, V3-431, V3-471, V3-471G, V3-531, V3-531G, V3-551, V3-551G, V3-571, V3-571G, V3-731, V3-731G, V3-771, V3-7710, V3-7710G, V3-771G, V3-772G, , M3-481, M3-481G, M3-580G, M3-581G, M3-581PT, M3-581PTG, M3-581T, M3-581TG, M5-481, M5-481G, M5-481PT, M5-481PTG, M5-481T, M5-481TG, M5-581G, M5-581T, M5-581TG, M5-582PT, M5-583P, P3-131, P3-171, S3-331, S3-371, S3-391, S3-392, S3-392G, S3-951, S5-391, S7-191, S7-391, S7-392, V5-121, V5-122P, V5-123, V5-131, V5-132, V5-132P, V5-171, V5-431, V5-431G, V5-431P, V5-431PG, V5-452G, V5-452PG, V5-471, V5-471G, V5-471P, V5-471PG, V5-472, V5-472G, V5-472P, V5-472PG, V5-473, V5-473G, V5-473P, V5-473PG, V5-531, V5-531G, V5-531P, V5-531PG, V5-551, V5-551G, V5-552, V5-552G, V5-552P, V5-552PG, V5-561, V5-561G, V5-561P, V5-561PG, V5-571, V5-571G, V5-571P, V5-571PG, V5-572, V5-572G, V5-572P, V5-572PG, V5-573, V5-573G, V5-573P, V5-573PG, V7-481, V7-481G, V7-481P, V7-481PG, V7-482P, V7-482PG, V7-581, V7-581G, V7-581P, V7-581PG, V7-582P, V7-582PG, 1100X, 1110X, 1600X, 1601M, 1601X, 1602M, 6100, 6400, 6600, C500, E360, E380, E500, E560, E571, E600, E650, E700, EL, ELD, G3-605, G7700, G7710, G7750, IDea500, IDea510, L100, L310, L320, L350, L3600, L5100, M1100, M1200, M1201, M1202, M1420, M1470, M1600, M1610, M1620, M1640, M1831, M1860, M1920, M1930, M1935, M3100, M3160, M3200, M3201, M3202, M3203, M3300, M3400, M3410, M3420, M3450, M3470, M3470G, M3600, M3640, M3660, M3710, M3800, M3802, M3860, M3900, M3910, M3920, M3970, M3970G, M3985, M5100, M5200, M5201, M5400, M5600, M5620, M5621, M5630, M5640, M5641, M5700, M5800, M5802, M5810, M5811, M5910, M7720, MC605, ME600, R1600, R3600, R3610, R3700, SA10, SA20, SA60, SA80, SA85, SA90, T100, T135, T136, T160, T180, T300, T3-100, T320, T3-600, T3-605, T600, T630, T650, T660, T670, T671, T680, T690, TC-100, TC-102, TC-105, TC-600, TC-603, TC-605, X1200, X1300, X1301, X1400, X1420, X1420G, X1430, X1430G, X1440, X1470, X1700, X1800, X1900, X1920, X1930, X1935, X3-100, X3200, X3300, X3400, X3400G, X3450, X3470, X3475, X3-600, X3810, X3812, X3910, X3950, X3960, X3990, X3995, X5810, XC100, XC-105, XC600, 90-602, 90-603, Xc-603G, Ninety-605, 5600U, 7600U, U5-610, Z1100, Z1110, Z1220, Z1620, Z1650, Z1800, Z1801, Z1810, Z1811, Z1850, Z3100, Z3101, Z3-105, Z3170, Z3171, Z3280, Z3-600, Z3-605, Z3-610, Z3620, Z3730, Z3731, Z3760, Z3761, Z3770, Z3771, Z3800, Z3801, Z5101, Z5600, Z5610, Z5700, Z5710, Z5730, Z5751, Z5760, Z5761, Z5770, Z5771, Z5801, ZC-102, ZC-105, ZC-602, ZC-605, ZC-610, ZS600, ZS600G
- Aspire One series: AO521, AO522, AO531h, AO532h, AO533, AO721, AO722, AO725, AO751h, AO752, AO753, AO756, AOA110, AOA150, AOD150, AOD250, AOD255, AOD255E, AOD257, AOD260, AOD270, AOD271, AOHAPPY, AOHAPPY2, AOP531h
- Ferrari series: one thousand, 1100, 3000, 3200, 3400, 4000, 5000
- Extensa series: 2000, 2300, 2350, 2500, 2600, 2900, 2900D, 2900E, 2950, 3000, 3100, 4010, 4100, 4120, 4130, 4210, 4220, 4230, 4420, 4430, 4620, 4620Z, 4630, 4630G, 4630Z, 4630ZG, 500, 5010, 5120, 5200, 5210, 5220, 5230, 5230E, 5235, 5410, 5420, 5420G, 5430, 5510, 5510Z, 5610, 5610G, 5620, 5620G, 5620Z, 5620ZG, 5630, 5630EZ, 5630G, 5630Z, 5630ZG, 5635, 5635G, 5635Z, 5635ZG, 6600, 6700, 6700Z, 710, 7120, 7220, 7230, 7230E, 7420, 7620, 7620G, 7620Z, 7630, 7630EZ, 7630G, 7630Z, 7630ZG
- Veriton serial: A430_31, A430_51, Z2610G, Z2611G, Z2620G, Z2621G, Z2630G, Z2640G, Z2650G, Z2660G, Z280G, Z290G, Z291G, Z410G, Z430, Z431G, Z4610G, Z4611G, Z4620G, Z4621G, Z4630G, Z4631G, Z6610G, Z6611G
Propose an edit

Source: https://neosmart.net/wiki/acer-recovery-disk/
Posted by: gatlinouldou.blogspot.com
0 Response to "Acer Aspire 5552 Red Screen Repair?"
Post a Comment